Chrome 70 and self-signed certs

NethServer Version: 6.10 Final

Has anyone found a good solution for the Chrome issue with self-signed certs?

My systems have only a green (lan) network and sit behind a firewall.

All access is from the local network, nothing inbound from the internet.

I don’t mind wasting cycles encrypting traffic, but I can’t sort out how to get Chrome to quit bullying me about the self-signed cert ns generates. Even after adding it to the CA store, Chrome still complains.

Is there a solution?

Maybe this will help.

Find the below setting under settings -> privacy and turn it off.

I wrote a little HoTo here: Tp-link EAP Controller on Nethserver

It works:

image

also with chrome 70.

LayLow, thanks for the suggestion, but that’s not a good idea. Users will still need to access the internet.

Also, it did not help. Chrome still complains ns is not safe.

In my opinion, this is a Chrome issue. There should be an exception for hosts that are part of the local network, or for users to exempt certain hosts. I’d venture an informed user is as good an authority as any certificate service.

1 Like

Ralf, I don’t find an option to upload certificates in ns 6.10. Is this due to a particular module that I probably don’t have loaded? Or might it be an ns 7 thing?

Sorry this is for NS 7, my fault. But you can change certs in db settings:

Config should look like this:

[root@nethserver ~]# config show pki
pki=configuration
    CertificateDuration=3650
    ChainFile=
    CommonName=nethserver.jeckel.local
    CountryCode=AT
    CrtFile=/root/ssl/server.crt
    EmailAddress=office@jeckel.at
    KeyFile=/root/ssl/server.key
    LetsEncrypt=disabled
    LetsEncryptDomains=
    LetsEncryptMail=
    LetsEncryptRenewDays=30
    Locality=6890 Lustenau
    Organization=Jeckel Ges.m.b.H. & CO KG
    OrganizationalUnitName=Main
    State=Austria
    SubjectAltName=*.jeckel.local

To change:

db configuration setprop pki CrtFile /path/to/your/server.crt
db configuration setprop pki KeyFile /path/to/your/server.key
signal-event certificate-update

I’ve not used an e-smith-based system in quite a few years, but it’s slowly coming back to me.

Okay, db updated and templates expanded and services restarted.

Now I get a “Windows does not have enough information to verify this certificate” error.

I did a quick google and this has to do with Intermediate Certificate? Any ideas?

I do wish google would get off their high horse and allow us mere mortals to say “Hey, I trust this server!”

Where did you place your rootCA.crt certificate on your Win-machine?
Sorry, I don’t have an english version, but it should be “Trusted authority” or similar.

EDIT: Please show me the output of openssl x509 -text -in server.crt -noout and also your servername/FQDN

In Windows, the cert is in Trusted Root Certification Authorities.

Certificate:
    Data:
        Version: 3 (0x2)
        Serial Number: 11130630518802448858 (0x9a77f17bf75781da)
    Signature Algorithm: sha256WithRSAEncryption
        Issuer: C=US, ST=Tennessee, L=Dayton, O=Transmissions Plus, OU=tplus, CN=acer.tplus/emailAddress=tplusxxx@gmail.com
        Validity
            Not Before: Nov 15 13:08:46 2018 GMT
            Not After : Nov 12 13:08:46 2028 GMT
        Subject: C=US, ST=Tennessee, L=Dayton, O=Transmissions Plus, OU=tplus, CN=acer.tplus/emailAddress=tplusxxx@gmail.com
        Subject Public Key Info:
            Public Key Algorithm: rsaEncryption
                Public-Key: (2048 bit)
                Modulus:
                    00:ae:39:20:66:4f:24:8c:69:28:ec:ca:63:2b:2a:
                    97:dc:48:20:2b:98:12:dd:a8:b3:db:c5:d5:0f:92:
                    79:3a:0d:46:f2:0c:2d:1c:74:a0:b9:29:73:f1:1a:
                    37:bb:0d:bd:e8:1d:36:be:be:62:a9:18:98:91:7f:
                    29:08:f0:e3:3a:29:a6:da:3a:2b:e8:70:85:d9:86:
                    f5:29:7a:0e:46:94:6d:a9:14:62:97:69:61:30:33:
                    89:48:e8:b9:d3:ec:0d:65:53:c0:57:25:b5:43:80:
                    ea:6e:87:f0:9f:45:10:39:af:f0:70:93:64:4a:07:
                    a6:e3:68:ea:4e:ba:a5:5e:3a:e9:97:85:6d:27:13:
                    c9:14:3e:36:bb:4f:a2:7a:52:95:9b:9a:01:0f:65:
                    71:99:1a:d5:65:3a:d2:d1:37:d2:2a:0e:0c:73:64:
                    4a:21:73:91:66:76:2b:66:70:c2:83:c1:50:fb:20:
                    a4:2e:85:8e:de:83:0f:e1:12:6f:33:65:f4:d0:a7:
                    e4:ba:ab:9b:67:08:a9:79:c3:22:dc:90:14:c5:a5:
                    ec:bb:bc:44:6b:0a:b6:cf:3f:d5:51:61:40:73:35:
                    a0:d9:64:e1:20:f9:2e:d7:d4:c1:de:3f:08:4a:0d:
                    d7:39:5e:b5:0f:3d:6b:a9:e9:e0:a0:6e:4c:ce:95:
                    79:0f
                Exponent: 65537 (0x10001)
        X509v3 extensions:
            X509v3 Authority Key Identifier:
                keyid:B1:68:1C:E4:1E:B3:4F:CE:DE:22:CD:4B:23:A1:0E:E1:E5:8A:79:82

            X509v3 Basic Constraints:
                CA:FALSE
            X509v3 Key Usage:
                Digital Signature, Non Repudiation, Key Encipherment, Data Encipherment
            X509v3 Subject Alternative Name:
                DNS:acer.tplus
    Signature Algorithm: sha256WithRSAEncryption
         2e:c8:f3:4c:db:3b:5e:a6:69:45:c4:38:b3:c5:2b:f8:b0:48:
         98:dd:f6:c5:12:8f:69:46:66:d1:5c:6e:91:67:2b:46:e9:3a:
         be:02:a7:64:59:ea:76:f0:ae:29:9d:60:3f:13:3d:fc:70:8a:
         f1:d8:17:a3:10:61:95:e9:25:97:f8:6d:4d:02:62:84:17:68:
         d1:26:80:24:e3:40:40:e4:db:a3:3c:72:e2:56:66:4c:45:c1:
         84:60:8a:53:d1:19:08:27:41:57:f5:ca:e4:54:a7:3f:43:d7:
         98:5d:b5:37:d4:1a:31:95:7c:fe:66:91:29:ce:94:d8:88:8f:
         96:3e:80:f8:ca:17:b8:12:67:5f:45:a0:78:12:21:f1:a8:3f:
         32:25:c4:9f:0f:75:01:2f:63:5b:f7:96:7a:dc:75:f8:84:1b:
         01:09:26:ee:77:51:47:7e:00:4f:93:fd:4a:40:f7:64:84:28:
         64:16:6a:7c:b8:c6:15:bb:bd:ac:11:ff:2a:26:bd:d6:0c:9b:
         8d:cc:d4:75:11:b5:e6:dc:6b:88:b9:1a:0d:9d:c8:d9:49:ab:
         ac:39:a5:f8:a6:72:4c:09:91:72:58:aa:f5:43:12:8c:a5:b3:
         69:7a:6d:68:a2:d8:57:04:32:0e:70:f4:40:23:0d:81:0f:b5:
         75:95:34:de


# hostname -f
acer.tplus

I’m going to have to walk away for a few hours. “Real work” calling my name :slight_smile:

No problem, take your time. :wink:

As far as I can see, you choose only “domain.tld” for your FQDN. AFAIK the FQDN has to have 3 parts: server.domain.tld. There is the difference between DOMAIN and FQDN.
In my case I choose for the rootCA “authority.domain.tld” and for the server itself “server.domain.tld” and also for the SAN “server.domain.tld”. Every server more I use the rootCA to create a new cert for it. This way I only have to install the rootCA once on the clients. Every server which is signed with the “authority” will be accepted.

1 Like

Ok. I went back and redid this using an FQDN and the results were not improved.

I still have to accept the Chrome warning to get to the server on “first” access after closing Chrome or after a reboot or logout. Once that is done, I still get the red “Not secure” warning in the address bar.

I did find a slightly different approach that has eliminated the initial Chrome warning, but am still left with the “Not secure” warning. That address bar warning creates support issues for new users, and in a high turnover environment there are always new users. Plus, I hate to be responsible for training users to ignore security warnings.

I will continue to work on this and if I get something that eliminates the address bar warning, then I will post back with the solution. Considering every browser vendor’s handling of this security stuff, I’m not confident a good solution exists. Yet.

I can think of two possible solutions:

I’d vote for the first. I haven’t tested that method with NS6, but I’d expect it should work–possibly with some slight changes to the configuration properties being used.

In any event, the name used by the client needs to match a name on the cert. If your cert covers only neth.yourdomain.com, for example, and users are visiting www.domain.com (or simply domain.com), they’ll get errors no matter what. The same is true if they browse by IP address (which isn’t unusual for internal servers). It’s perfectly straightforward to get a cert covering multiple domains using Let’s Encrypt; it’s rather more complicated to create such a cert yourself.

1 Like

Hi Dan, this is what I was trying to say. Create a rootCA, use this to sign the servers cert and install the rootCA as trusted authority on the client side. It works with opera, firefox, IE11, Edge and chrome on my machines. I used this for NS6 and now for NS7.
image

That’s a lot of hoops to jump through! Whatever happened to KISS and just telling the browser the server is A-OK? The whole point in going with a “no admin skills required” solution like NethServer was to not have to do this kind of thing. If this is how browsers are going to be, then a server-in-a-box solution needs to solve the problem.

Maybe I should switch to ns7? Is it up to date enough to deal with the current state of browsers? I spent a lot of time proving the need to keep systemd out of supercomputer farms (over 100K CPUs in one case) as it was not a good solution in that environment. I guess for a single internal server in a small shop with no inbound access (owner’s rule), where I won’t be dealing directly with the systemd nonsense, I can learn to put up with it. If it solves this.

FYI, I had to retire from IT after 35 years due to a brain episode that has left me with an amnestic disorder. I can still sort out some things, but new things don’t stick and complex things quickly outpace my focus. Anything I don’t repeat daily will be all new again within a month. Hence, I need something I can set and forget, not set and tweak and fiddle with constantly. Especially since I’m doing this as a favor and won’t be present to babysit it.

If ns7 can handle this OOTB, then I will switch. Otherwise, I’ll look beyond NethServer for a solution.

Ralf, when I followed your instructions, including going back through and using a server.domain.tld fqdn, it does not work. As the target environment uses Chrome exclusively - not under my control - then it has to work with the latest Chrome.

This isn’t a must-have project. I simply wanted to move some apps being hosted externally onto an internal server in order to improve performance. This is a rural location that’s lucky to get 4-5MB downlink speeds. And, I need that server to be drop dead simple to administer.

As I just replied to Dan, I’m going to switch the server to ns7. If it has tools to solve this out of the box, then I’ll stick with ns7. If it doesn’t, then I’ll consider NethServer to not be viable due to failure to support current browser standards and look elsewhere. It’s not that I have better things to do - just that I have things I can do better these days.

Hi Scott,

my picture in post 3 was done with

image

so I know it’s working also with the latest chrome.
There is one important thing: server fqdn = common name = SAN. All must be the same, otherwise browsers will complain. It took me some time to get t working the first time, but when I got it, the next time was really easy. :slight_smile: Don’t give up :+1:
And don’t look for another distro please. Servers with selfsigned certs in a closed environment are always a pain with the newest browsers.

This.

Depends. Will the server be accessible from the Internet? If so, then yes, NS7 has Let’s Encrypt built in, so it will be able to automatically obtain and renew a trusted cert. If not, but your DNS service is with one of the 50+ that are supported by acme-sh, then you can use the wiki page I posted up-thread.

If your server is private, your DNS service isn’t with one of those providers, and you’re unable or unwilling to switch to one that acme.sh supports, you can use acme-dns. That will allow you to host your own DNS for validation purposes.

Any of the Let’s Encrypt methods will automatically renew the cert forever. You should never need to touch it again, unless you need to change the names on the cert.

Now, if none of those options is acceptable, NS7 uses a self-signed cert just like NS6.

I think I will let this project go and see if/when there’s an official solution integrated into NS6/7. The site will just have to make do with apps served across the internet over a slow connection. I was hoping NS would be a quick solution - install NS, move apps and db, change some bookmarks, maybe a fiddle here and there, then done. It seems I was too optimistic.

I saw your post vis-a-vis adding a CA feature (thanks for that.) I hope the community will recognize that:

a) server-only installations exist and have different needs,

b) NethServer used primarily as an application host is a thing,

c) not everyone has the option to open inbound access from outside the local network (so browsers/servers often operate in isolation),

d) not everyone has DNS that allows tuning needed for acme,

e) browsers are becoming increasingly rigid with regard to security,

f) ergo, providing a working and simple (as possible) solution – in what is supposed to be a hassle-free, no-admin-needed server – and indeed, that is a principle "selling’ point of NethServer – is probably a key requirement.

As I’ve stated before, I think this is a problem created solely by e) above. It is presumptive of the browser vendors (and I believe will prove ultimately a failure) to think every server in every scenario requires a CA.

I’ll watch, but until something materializes (as in, in-built support that doesn’t require a bunch of extra fuss) I will not be pursuing this further.

I hope you understand: This kind of stuff used to be meat and potatoes for me - I loved the challenge and almost always found solutions - but now it is just a frustrating reminder that I cannot do with struggle what I once did with ease. I need to invest my cycles where they can produce results, not frustration.

Okay, I couldn’t just walk away.

So… I enlisted the help of a couple of people still actively working with this stuff on a regular basis. None of us are network or security gurus, but we all do or used to do quite a bit of integration work. That is to say - we got it to work, but your mileage may vary.

What follows is simply a distillation of the notes we kept while passing ideas around.

This was developed using Windows 10 and Chrome 70 on the
client side, with NethServer 6.10 running as the server.

------------------------------------------------------------
What are we doing?
------------------------------------------------------------

The old method of creating self-signed server certificates,
and then importing that certificate as a Trusted Certificate
Authority (CA), just doesn't work anymore. Security has
tightened up recently (as of Nov 2018) and things that used
to work, well, they just don't now.

Instead, we are going to create a Root CA - making ourselves
the signing authority - and then using that to sign all of
our server certificates. Only the Root CA will need to be
imported into the Trusted Root CA store on the client(s).

The Root CA can be used to sign one or many certificates,
according to how many hosts you need to support.

------------------------------------------------------------
Ensure name resolution knows your host(s)
------------------------------------------------------------

In this example we are using myhost.mydomain.mytld as the
FQDN of the (in this case) web server. Your DNS must be able
to resolve the FQDN, as well as 'myhost' alone. (Of course,
your actual host.domain.tld selection will probably vary.)

If you have access to and/or control over DNS, then setup
the names in DNS. This is a one-and-done task.

If, like me, you have no control over the network services
or administrators, but you do have administrative access to
the clients (Windows 10 systems in my case) - then you can
add the host IP and names into the file:

C:\Windows\system32\drivers\etc\hosts

For example, add a line such as:

192.168.1.xx  myhost.mydomain.mytld  myhost

You'll do this on each client system, but once done it won't
need to be repeated (unless a system is wiped and reloaded.)
Modifications to the 'hosts' file survive most updates, and
generally speaking it will be obvious if the hosts file has
gone over.

Bottom line: Make sure your browser can reach both the FQDN
(myhost.mydomain.mytld) and the hostname (myhost).

------------------------------------------------------------
Setup a Root CA
------------------------------------------------------------

I generally create my certificate files in ~/certs, but you
can do this wherever you like.

# change into the certs directory
cd ~/certs

# generate the CA private key
openssl genrsa -des3 -out ca.key 2048

# generate the root CA file
openssl req -x509 -new -nodes -key ca.key -sha256 -days 3654 -out ca.pem \
    -subj "/C=US/ST=NY/L=New York/O=My Company/OU=IT/CN=My Root CA"

Make this file accessible to your client system (by whatever
method you prefer) and then import the ca.pem file into your
client's (browser's) Trusted Root Certification Authority
store. More on doing this in Windows 10 later.

------------------------------------------------------------
Issue a signed server certificate
------------------------------------------------------------

# make sure we are in the certs directory
cd ~/certs

# generate the server private key
openssl genrsa -out myhost.mydomain.mytld.key 2048

# generate the certificate signing request (CSR)
openssl req -new -key myhost.mydomain.mytld.key -out myhost.mydomain.mytld.csr \
    -subj "/C=US/ST=NY/L=New York/O=My Company/OU=IT/CN=myhost.mydomain.mytld"

# create a configuration file for extensions (primarily for subjectAltName)

cat > ext.conf <<ENDCONF
authorityKeyIdentifier=keyid,issuer
basicConstraints=CA:FALSE
keyUsage = digitalSignature, nonRepudiation, keyEncipherment, dataEncipherment
subjectAltName = @alt_names

[alt_names]
DNS.1 = myhost.mydomain.mytld
DNS.2 = myhost
ENDCONF

# generate the server certificate
openssl x509 -req -in myhost.mydomain.mytld.csr -CA ca.pem -CAkey ca.key \
    -CAcreateserial -out myhost.mydomain.mytld.crt -days 3654 -sha256 \
    -extfile ext.conf

------------------------------------------------------------
Make sure NethServer's server name is setup
------------------------------------------------------------

Access the NethServer manager, go to the 'Server name' panel,
and set the 'Hostname' to 'myhost' and the 'Domain' to
'mydomain.mytld' (if not already so set.)

Ensure that your client browser can access the server via
both the hostname and the FQDN (ie, hostname+domain.)

------------------------------------------------------------
Make NethServer (apache) use your new crt & key files
------------------------------------------------------------

# from the NethServer console, root login
db configuration setprop pki CrtFile /root/certs/myhost.mydomain.mytld.crt
db configuration setprop pki KeyFile /root/certs/myhost.mydomain.mytld.key
signal-event certificate-update ; sleep 30

I've found it best to give the services a bit to settle down
before you start testing things. Hence, sleep 30.

------------------------------------------------------------
Configure Windows 10 with your new CA PEM
------------------------------------------------------------

Chrome uses the Windows certificate store instead of rolling
it's own. Yay? Boo? It is what it is.

The ca.pem file created above must be imported into Windows
as a Trusted Rood Certification Authority.

To do so:

Press WinKey-S and start a search for 'certificate'.

When 'Manage computer certificates' comes up, run that app.

Double-click on 'Trusted Root Certification Authorities', then
click on 'Certificates'. This will show the known root CAs.

Right-click on 'Certificates' and then click 'All tasks' and
then select 'Import...' and follow the prompts.

At the 'File to Import' dialog, click on 'Browse...' and then
find where you have your ca.pem file. (You probably copied the
file over to Windows, or maybe have a shared directory mounted,
or some other method to make the file visible to Windows.)

Once you've navigated to where the file resides, you won't see
the .pem file. This is due to the file open dialog's filter.
Change the filter to 'All files' and open the ca.pem file.

Continue following the prompts until finished.

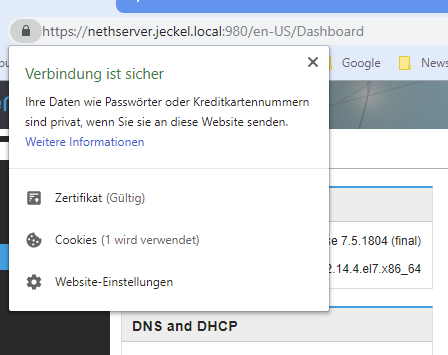
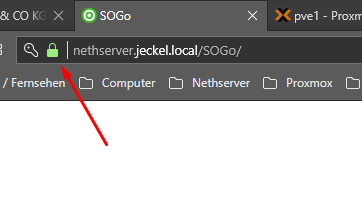
You now have a Trusted Root CA that will authenticate any cert
that was signed by it!

There is no need to export server certificates and then
import each of them into the client Trusted Root CA!

------------------------------------------------------------
Additional hosts (servers)
------------------------------------------------------------

As stated above: You only have to add the root ca.pem once
to each client.

For each new host, the process is:

Issue a signed server certificate (ie, create a new key,
then csr, then sign the new certificate using the ca.pem
file.) Once that's done, install the new key and crt files
on the new host. Your clients (with the Trusted Root CA
already installed) should have no issues when accessing your
new host.

------------------------------------------------------------
Additional hosts (servers)
------------------------------------------------------------

I know that, in theory, virtual domains should be able to
utilize the root CA. It is, however, beyond my knowledge at
this time as to how to integrate that into the NethServer
template and event system. I'll leave it to the "pros" to
figure out that - along with how to integrate this into the
NethServer management console and documentation.
1 Like