#An amazing and easy solution to filter your email: NethServer
##Scenario
An organization with an internal mail server (eg. Microsoft Exchange server) with no antispam/antivirus email filter or with a commercial solution that organization wants to replace.
##Brief introduction
Filter emails is a common problem of small/medium business, why not try a new amazing solution based on linux, with a straightforward installation and a clear administration Web interface? Newer to linux? Don’t be scared!
With this article you will be able to install, configure and manage your NethServer as well as any other solution available on the market such as SOHO hardware firewall, software or service.
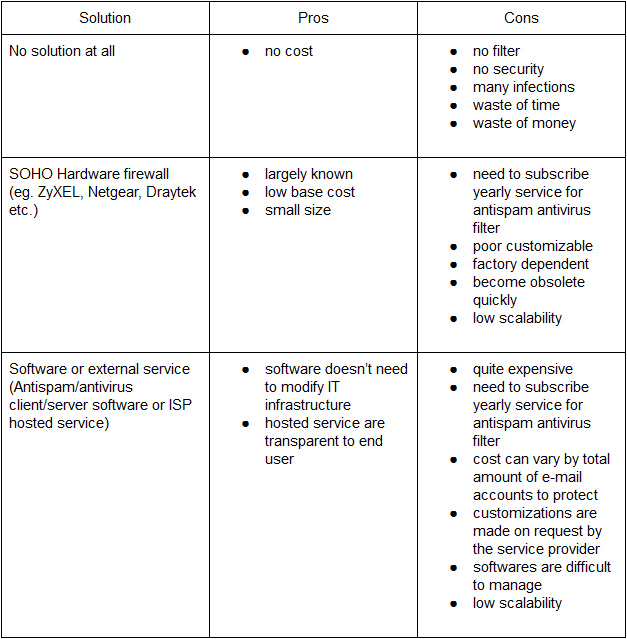
##Solutions comparison
The Table below reports pros and cons of commons solutions we can find in small/medium low budget business.
##What you need to know about NethServer
NethServer offer:
- complete documentation http://docs.nethserver.org/en/latest/index.html
- straightforward installation http://docs.nethserver.org/en/latest/installation.html#installation-types
- clear administration Web interface http://docs.nethserver.org/en/latest/access.html
- very responsive technical support through its community http://www.nethserver.org/community/
Prepare migration to NethServer is a short to do list:
- download the ISO file and burn it on a CD/DVD http://www.nethserver.org/getting-started-with-nethserver/
- get a PC or server that meets NethServer minimal hardware requirements http://docs.nethserver.org/en/latest/installation.html#minimum-requirements
- two NICs one to be connected to LAN one to be connected to the Internet gateway (router)
- a Web browser to access the administration Web interface: Server Manager
##Build your antivirus/antispam gateway with NethServer
###Preparation
Remember table at top of this post? Which solution are you actually using?
Basically you could be in one of these two network situations:
- Situation A: your Internet gateway (eg. router ADSL) and your Exchange server are both attached to your LAN hub/swicth
- Situation B: you Internet gateway (eg. router ADSL) is attached to the WAN interface of your firewall, LAN interface of your firewall and your Exchange server are both attached to your LAN hub/switch
If you are in the situation “A” you have to change network subnet class addresses of your Internet gateway, for example: from 192.168.1.1 to 192.168.2.1
then you have to configure your NethServer first NIC with IP address 192.168.1.1 to communicate on LAN and the second NIC could be configured with IPaddress 192.168.2.2 to communicate with your Internet gateway.
NethServer’s second NIC must be directly connected to your Internet gateway or both connected to a dedicated hub/switch.
If your are in the situation “B” things are quite simple, it will be sufficient configure your NethServer NICs with same IP addresses of your firewall WAN and LAN interfaces and precisely:
- NethServer’s first NIC IP address = your firewall LAN interface IP address
- NethServer’s second NIC IP address = your firewall WAN interface IP address
When all NethServer configurations will be terminated you could turn off your firewall and switch network cables to give it a try, if something doesn’t work you can always switch back network cables.
###Installation
- Boot your PC/server from NethServer installation CD-ROM
- At installation menu pick “NethServer interactive install”
- Follow step by step basic configuration wizard
#####During step by step basic configuration wizard pay attention to just one point: network configuration is referred to LAN, you will be able to configure the second NIC later from administration Web interface.
###Configuration
- Point your web browser to https://IP-address-you-entered:980 and when prompted accept to continue with the non secure site, the warning is just because NethServer uses a self-signed SSL certificate.
- To logon enter root as username and password you specified during interactive install (version 6.5) or the default password Nethesis,1234 (version 6.6)
- You will display NethServer Dashboard with administration menu on the left
- Install mail-server from Package manager then click on Apply button located either on the top or bottom of the page
- Ignore optional services installation because your server should just filter emails then forward (or not) them to the rear mailserver, eg. MS Exchange. Click on the “Proceed installation” button at the bottom of the page.
- Wait until progression bar reaches 100% and you will be notified that package installation is completed.
- Click on the Email section on the left menu then on the right click “Create new domain” button of the Domains tab.
- In the domain filed enter your domain (eg. myorganization.com) and optionally a brief description.
- Click on the “Relay to another server” radio button.
- Input IP address of your internal mail server, eg. your MS Exchange server.
- Ignore disclaimer check box.
Don’t forget to enable appropriate filter options.
The Mailboxes tab could be ignored if all domains are set to deliver to other server.
You could have multiple exchanges behind a single NethServer.
This is right, but the mail-server includes also LDAP, IMAP and POP
services that maybe are not required in this scenario.
Credits
Many thanks to @alefattorini @davidep @filippo_carletti for encouragements and support (and corrections ;-)) they gave to me.