This howto describes the installation of Pimox 7 - Proxmox 7 on a Raspberry Pi 4. I think it could be useful for Nethserver ARM development to have more instances/snapshots of development and testing VMs.
Thanks to @fausp and @mark_nl for the great work in Install Nethserver on CentOS 7 armhf?
Install Pimox 7
Get debian bullseye daily image from https://raspi.debian.net/daily-images/ and flash to SD card:
wget https://raspi.debian.net/daily/raspi_4_bullseye.img.xz
xzcat raspi_4_bullseye.img.xz | dd of=/dev/mmcblk0 bs=64k oflag=dsync status=progress
In my case I used a SATA to USB adapter to use an SSD, I booted with SD card:
xzcat raspi_4_bullseye.img.xz | dd of=/dev/sda bs=64k oflag=dsync status=progress
For Windows you may use Etcher or Raspberry Imager to flash the SD card.
(Re)boot the Pi and login as root - there’s no password
# Enable SSH root login
nano /etc/ssh/sshd_config
add Permitrootlogin yes
systemctl restart sshd

# set root password
passwd

# update system
apt update;apt full-upgrade -y

# install needed packages
apt install git curl screen wget -y

# set interfaces
# I used IP address 192.168.1.30 with gateway 192.168.1.11
# and hostname pimox
echo "auto eth0
iface eth0 inet static
address 192.168.1.30/24
gateway 192.168.1.11" > /etc/network/interfaces.d/eth0

# set hostname and hosts
echo 'pimox' > /etc/hostname
echo '192.168.1.30	pimox' >> /etc/hosts

reboot
Use screen or tmux to make the installation process survive the network reconfiguration.
screen
curl https://raw.githubusercontent.com/pimox/pimox7/master/pimox.sh | sh
Use default settings, just press Enter
The SSH connection will be lost but you can reconnect to SSH session and reattach with screen -d;screen -r` to see the process finishing.
- Reboot
- Browse to the Proxmox Web UI at https://192.168.1.30:8006 and login with root.
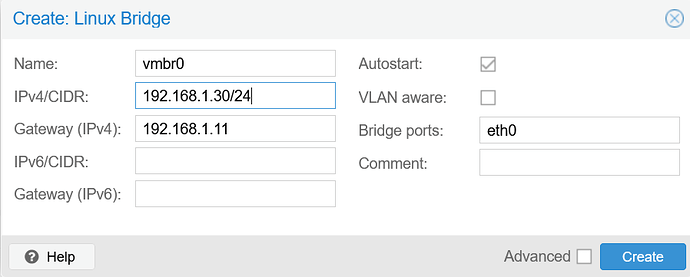
- Create a Linux bridge vmbr0 with port eth0 in Proxmox UI in the Hosts Network settings.
Install Nethserver armhf VM on the Pimox7
@mark_nl provides a qcow2 image, download and extract it on the pimox:
wget https://github.com/markVnl/nethserver-createimg/releases/download/dev-qemu-efi/Nethserver-7.9.2009-Final-Qemu-Efi-armhfp.qcow2.xz
xz -T 0 -k -d Nethserver-7.9.2009-Final-Qemu-Efi-armhfp.qcow2.xz
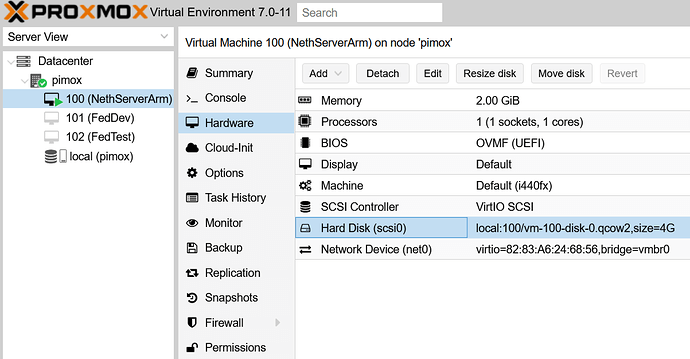
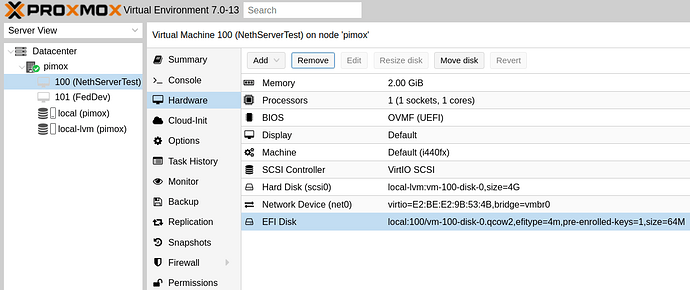
Create a new VM (in my case with VM ID 100) in UI and name it, select no media and no firewall.
Detach and remove the hard disk of the VM in the VM Hardware view.
Import NethServer qcow disk to VM 100 to local_lvm storage in qcow2 format to make snapshots available:
qm importdisk 100 Nethserver-7.9.2009-Final-Qemu-Efi-armhfp.qcow2 local --format qcow2
Go to VM Hardware and double click the Hard Disk and “Add” it.
Open /etc/pve/qemu-server/100.conf (config file of VM with ID 100) and add/edit arch, bios and boot.
arch: arm is needed for armhfp 32 bit.
arch: arm
bios: ovmf
boot: order=scsi0
cores: 1
memory: 2048
name: NethServerArmhfp
net0: virtio=16:F1:1A:C6:E4:A7,bridge=vmbr0
numa: 0
ostype: l26
scsi0: local:vm-100-disk-0.qcow2,size=4G
scsihw: virtio-scsi-pci
smbios1: uuid=c6fa6feb-dac1-4f94-80dd-eccd47139027
sockets: 1
Start the VM.
Login as root with password Nethesis,1234
Get IP address and force NethServer install:
ip a
touch /var/spool/first-boot
reboot
After 2 minutes the NethServer configuration should be finished, you may check with journalctl -f
When you see “Startup finished in … 2min 8.671s” the NethServer VM should be ready at https://<VMIP>:9090
Install Fedora 34 VM as a base for Neth ARM development
# Get a Fedora 34 armhfp image
wget https://download.fedoraproject.org/pub/fedora/linux/releases/34/Spins/armhfp/images/Fedora-Minimal-34-1.2.armhfp.raw.xz

# Extract
xz -T 0 -k -d Fedora-Minimal-34-1.2.armhfp.raw.xz

# Convert from raw to qcow2 to make snapshots work
qemu-img convert -f raw -O qcow2 Fedora-Minimal-34-1.2.armhfp.raw Fedora-Minimal-34-1.2.armhfp.qcow2

# Import the disk.
# You need to prepare a VM first, see NethServer installation above
qm importdisk 101 Fedora-Minimal-34-1.2.armhfp.qcow2 local --format qcow2
Start the VM in the Proxmox console view, after boot you may set the root password or other settings.
Please follow Arm development setup for NS7 (how to get started) to setup an ARM development VM on Fedora 34.
Hints
Set root pw in image
# Needed for virt-customize
apt install libguestfs-tools

# Set root password to Nethesis,1234
virt-customize -a <image>.qcow2 --root-password "password:Nethesis,1234"
