Hi all,
It seems Santa passed before its normal route here, and leaved an howto @alefattorini asked a lot of time ago. So here’s the BgLUG Project condensed in a virtual lab and an howto on how to configure it.
Configuration of a virtual school lab
Linux goes to school project
This work is distributed under the license Creative Commons Attribution - Share Alike 4.0 International that allows modification, use, copying and redistribution also for commercial purposes as long as it is shared with the same license.
This guide contains instructions for installing and configuring a school laboratory in a virtual environment. It is provided to lab managers or anyone who wants to check out the virtual lab environment for simulation, test, demo, or any other reason.
The school lab is designed in two parts:
- The server with NethServer on-board, a CentOS-based GNU/Linux system which allows for an easy administration through an intuitive web interface and therefore suitable for people with little or no GNU/Linux knowledge;
- The client with the Edubuntu distribution, a simple and complete distribution for educational purposes.
The guide was created using Ubuntu 14.04 and 16.04, but the commands should resonably also work on other Debian-based distro.
Installation Requirements
To create a virtual infrastructure which can support a lab with our configuration, it is essential to install the following tools: Ansible, Vagrant, VirtualBox and Git.
Ansible
Our solution allows (and in fact requires) to provision server and clients configurations with the help of Ansible.
The playbooks contained within the BgLUG’s GitHub repositories are based on Ansible version 2 branch, so you are required to use at least version 2.0.0, because the repositories contain options which are not available in previous versions. The simplest installation is from the official repository of Ansible via PPA:
sudo add-apt-repository ppa:ansible/ansible
sudo apt-get update
sudo apt-get upgrade
sudo apt-get install ansible sshpass
FURTHER INFORMATION: sshpass library allows Ansible to simulate a password prompt for SSH connections.
VirtualBox
WARNING: Vagrant does not support Virtualbox 5.1.x, so it is recommended to install version 5.0.x.
VirtualBox is a virtualization system (technically, an hypervisor) designed for desktop use. It allows virtualization of the i386 and x86_64 architectures.
It is possible to install VirtualBox from official Ubuntu repositories as indicated below (replace trusty with your own version of Ubuntu/Debian: xenial, vivid, utopic, jessie, wheezy):
sudo sh -c 'echo "deb http://download.virtualbox.org/virtualbox/debian xenial contrib" >> /etc/apt/sources.list.d/virtualbox.list'
Then download the GPG keys with the following command if your distro is Ubuntu 16.04 (Xenial) or Debian 8 (Jessie)):
wget -O- -q https://www.virtualbox.org/download/oracle_vbox_2016.asc | sudo apt-key add -
Or the following for all other versions:
wget -O- -q https://www.virtualbox.org/download/oracle_vbox.asc | sudo apt-key add -
Then install VirtualBox:
sudo apt-get update
sudo apt-get install virtualbox-5.0
Finally, download and install the Extension Pack from the VirtualBox website. Installation is done double-clicking the Extension Pack once downloaded; please be aware to download the correct one for your version of Virtualbox.
Vagrant
WARNING: the latest version of Vagrant (1.8.5 at the time of revision of this guide) has some problems with SSH authentication during first activation. It is therefore advisable to install version 1.8.4.
Vagrant is a system that allows to create and run virtual machines and containers in a quick and easy way. We will use the virtualbox driver to run virtual machines.
Download the installer from the official Vagrant website.
Assuming that the installer is downloaded as vagrant_1.8.4_x86_64.deb, you may install it with just a double-click or with the following commands:
sudo dpkg -i vagrant_1.8.4_x86_64.deb
sudo apt-get install -f
Git
Install it with the following command:
sudo apt-get install git
Install and configure the virtual lab
Configuring network interfaces in VirtualBox
The server uses two network interfaces:
- One for the WAN (internet);
- One simulating the LAN.
The WAN network interface will be configured automatically by Vagrant as a NAT interface as soon as the machine is started the first time; we will instead LAN one as a host-only interface with the following as follows:
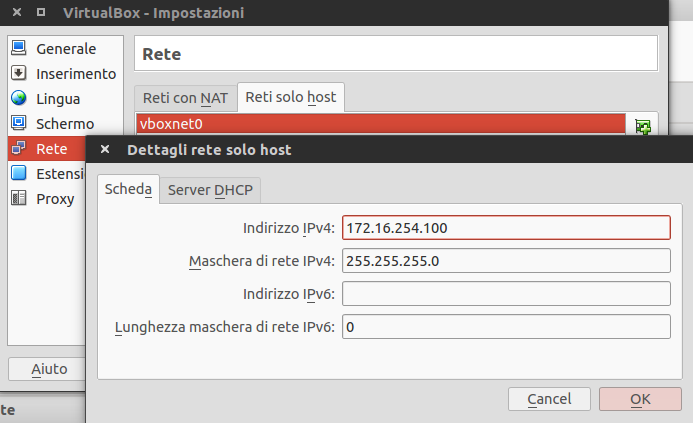
-
Go to VirtualBox File menu, then Preferences;
-
Click on the Network section, then on Host-only networks tab;
-
Click the + button on the right to add a new virtual network interface card, which will be called for example
vboxnet0. It is important to take note of this name, since it will be needed within virtual machine configuration file; -
Double-click on the new network card you just created and set the following information:
- IP address: 172.16.254.100 (or any other IP 172.16.254.x except .0, .1, .255);
- Netmask: 255.255.255.0;
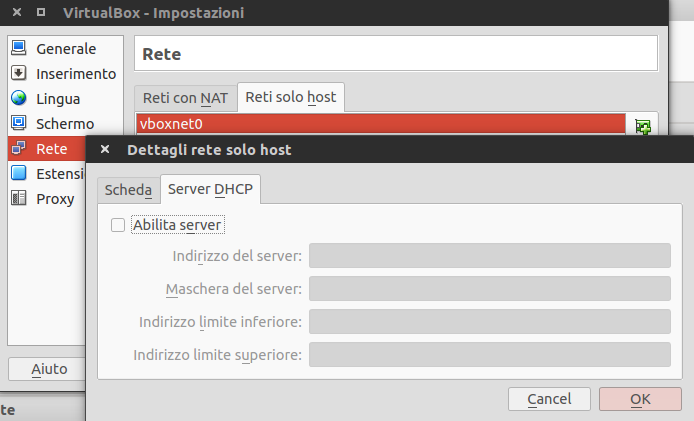
- Click on the tab DHCP Server and disable the service;
Server virtual machine creation and startup
First of all clone the project from GitHub repository:
git clone https://github.com/bglug-it/server-config.git virtual-lab
Then install the Server virtual machine:
cd virtual-lab
vagrant up

With vagrant up you will download an image (a box) containing a working NethServer 6.8 server system already set up to be run with Vagrant. After the download, vagrant up will create a new virtual machine within VirtualBox, name it NethServer and then will provision the virtual machine, setting up networking and SSH access.
Both Vagrant and Ansible will access the server VM using SSH protocol: Vagrant uses the local native vagrant account on a forwarded port (2222 on localhost), instead Ansible will access the VM as it was an host on the network (using vboxnet0 virtual interface). Ansible will use root account within init playbook, then will use the amgmt user within setup playbook.
FURTHER INFORMATION: Refer to the default password guide within the GitHub repository.
Server configuration via Ansible
Ansible will configure the virtual machine via SSH starting from the local PC. To simplify, quicken and automatize the configuration, the SSH authentication will use public/private SSH keys.
If you did’t create them already, create a pair of public/private keys with the following command:
ssh-keygen -t rsa -b 2048
It is optional to provide further information asked by the ssh-keygen command. Furthermore, we do not recommend to set a passphrase with this keys, to avoid a passphrase prompt at each Ansible run (security provided with a random-generated 2048bit key length is already much secure than a passphrase by itself).
Then run:
ansible-playbook init.yml --ask-pass
The requested password is the root user’s one, which, for a Vagrant box, is always vagrant. Please consult the default password guide for further explanation and reference.
The last command will set up SSH connection, creates the amgmt user, copy domain.yml file within the server (full path will be /etc/domain.yml), creates the /etc/facts.d directory, installs PyYAML extensions, python-libselinux and yum-utils packages.
From this moment on, Ansible will leverage SSH authentication configured with the amgmt user to authenticate itself and configure the system.
Now run the setup playbook to install and configure several packages within the server, such as SAMBA and PXE environment:
ansible-playbook setup.yml
FURTHER INFORMATION: We will clarify the role and the importance of some files within the server-config repository cloned with git:
-
hosts: contains the list of hosts that Ansible can manage. You may only find the IP address of the NethServer VM (172.16.254.1) and indications on what account to use for SSH authentication (amgmt); -
domain.yml: contains the information Ansible will use to configure NethServer VM; -
Vagrantfile: provides instructions to Vagrant for the automatic deploy of the virtual machine, configures its network stack and instructs Vagrant on calling Ansible to provision the newly created machine with the vagrant playbook; -
init.yml: Ansible playbook that contains the instructions to permit further Ansible access to the server without requesting a password each time; -
setup.yml: Ansible playbook that contains instructions to configure all necessary services within the server.
Set the Domain Administrator password
After completing the playbooks init and setup, open your favorite browser go to the following URL:
https://172.16.254.1:980
Ignore the security warning and login as root. Click on Next button to confirm all of the (standard NethServer) Wizard settings. Once you reached the Dashboard, click the Change admin’s password link, then change it to match the one indicated within the default password guide. This is really important if you want to test Edubuntu deployment within the virtual lab: the admin password must be the one indicated in the guide, unless the client deployment will fail (the machine will be unable to join domain).

Create then some generic users for the teacher and the student, which will be used to access the client virtual machines.
The teacher account must belong to the docenti (teachers in english) and domusers groups.
The student account must belong to the domusers group.
FURTHER INFORMATION: The server is configured by default with the following four domain groups:
-
domadmins, Domain Admins: Members of this group can fully manage the entire internal domain. They can add machines to the domain and access the console of NethServer; -
domusers, Domain Users: it contains all domain users. All users have a personal user folder and are authorized to access the shared folder named shared (Condiviso in italian, you will find it named like that on the desktop of the clients) in read/write mode; -
domopers, Domain Operators: Users enrolled in this group have the ability to use the commandsudoon all clients on the network; -
docenti, Teachers: the members of this group can use Epoptes on the teacher client.
Final configurations for the server
Set the vault password that will allow the automatic domain join for clients virtual machines:
ssh amgmt@172.16.254.1
echo 'vault_password' > .ansible/vault.txt
exit
Technically, the vault is a crypted file which contains the Domain Administrator password in plain text format. This file is present in the
client configuration repository (see domainpwd.vault file
within the repository
client-pull-installation). The vault password is the key to decrypt this file, which happens on the client-side each time it starts.
Refer to default password guide to properly configure your vault password.
Creating the clients VM: the lab
After the server VM creation, the first step is always to create a teacher machine. After the teacher machine has been created, you have to leave it started and may create the client virtual machines (for the students).
NOTE: Every client is created with a local user, bglug. This user has permission to use sudo with no password prompt. As for the user password, refer to the default password guide.
Installing the teacher machine
Define manually a new virtual machine within VirtualBox GUI with the following features:
- Operating System: Linux/Ubuntu (x64)
- RAM: 1 GB
- Disk: 10 GB (note: the default, 8 GB, is too narrow and the installation will fail!)
Then change the following settings:
Enable Network boot in the Boot Options between System options, they are used to start the installation process via PXE
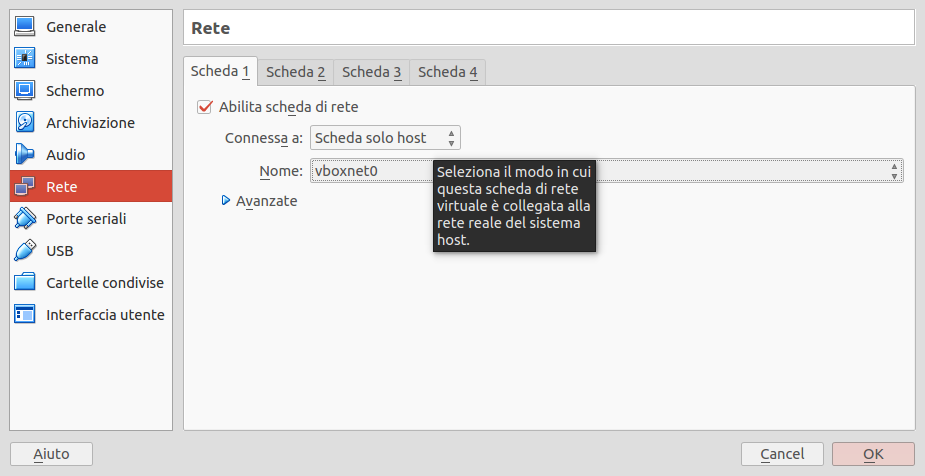
Then on Network options set only the first network card with the following parameters:
- Connected to: host-only Adapter
- Name:
vboxnet0(the one created at the beginning after installing VirtualBox)
Finally, start the virtual machine.
At first start, a menu should appear, in which you can select the voice Installa nuova macchina DOCENTI (Install a new TEACHERS client in english), then 64bit:

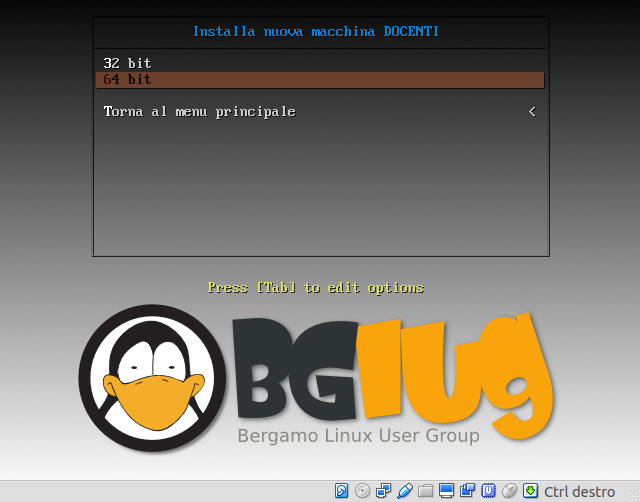
The installation of the teachers’ client will go on automatically.
Once the preseed phase of installation will end, the client will reboot automatically twice. During these reboots, Ansible will configure the client and instructs it to join the domain.
When installation and configuration are complete, you can log in with any domain user you configured before (e.g. admin, teacher or student users).
Installing the students’ machines
The installation of the client machines, those for the students, is identical to the one for the teachers, with the following differences:
-
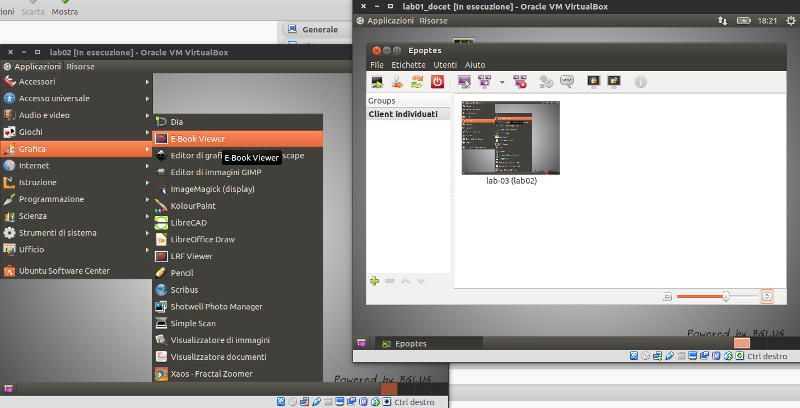
The teachers machine must be turned on while installing the client machines. During the configuration of the latter, Ansible downloads the certificate of the Epoptes server from the teachers’ machine (Epoptes is the software that allows to control the lab clients from the teachers’ PC);
-
Boot over the network (PXE) and choose the item Installa nuova macchina CLIENT (Install a new CLIENT machine in english).
After installation of the other lab machines, you may verify that within Epoptes on the teachers’ PC the newly created machines will appear as active.
Caveats
Problems with VirtualBox 4.3.x
With the VirtualBox version provided within official repos in Ubuntu 14.04 and its Extension Pack, the creation of the server VM with vagrant up will fail:
==> NethServer: Importing base box 'nethserver-6.8' ...
There was an error while executing `VBoxManage`, CLI used by Vagrant
for controlling VirtualBox. The command and stderr is shown below.

Command: [ "import", "n", "/home/paolo/.vagrant.d/boxes/nethserver-6.8/1.0.0/virtualbox/box.ovf"]

Stderr: 0% ... 10% ... 20% ... 30% ... 40% ... 50% ... 60% ... 70% ... 80% ... 90%. ..100%
Interpreting /home/paolo/.vagrant.d/boxes/nethserver-6.8/1.0.0/virtualbox/box.ovf ...
VBoxManage: error: Details: code NS_OK (0x0)
VBoxManage: error: Context: "Interpret" at line 328 of file VBoxManageAppliance.cpp
Problems with Vagrant 1.8.5
IMPORTANT: Do not use the version 1.8.5 of Vagrant because of an issue with the key authentication; at some point after the command vagrant up, the following error appears then the setup will go in timeout:
...
==> NethServer: Booting VM ...
==> NethServer: Waiting for machine to boot. This may take a few minutes ...
    NethServer: SSH address: 127.0.0.1:2222
    NethServer: SSH username: vagrant
    NethServer: SSH auth method: private key
    NethServer: Warning: Remote connection disconnect. Retrying ...
    NethServer:
    NethServer: Vagrant insecure key detected. Vagrant will automatically replace
    NethServer: this with a newly generated keypair for better security.
    NethServer:
    NethServer: Inserting generated public key Within the guest ...
    NethServer: Removing insecure key from the guest if it's present ...
    NethServer: Key inserted! Disconnecting and Reconnecting using new SSH key ...
    NethServer: Warning: Authentication failure. Retrying ...
    NethServer: Warning: Authentication failure. Retrying ...
    NethServer: Warning: Authentication failure. Retrying ...
    NethServer: Warning: Authentication failure. Retrying ...
    NethServer: Warning: Authentication failure. Retrying ...
...
Hope someone will like it and try it  We will appreciate any feedbacks.
And Merry Christmas to anyone here