Installation of Horde at Nethserver 7
Changes at 10 July 2017
- Don’t copy prefs.php, create a new one.
- Added installation and configuration of mail (imp and ingo)
Changes at 19 July 2017 - Added installation and configuration of calendar-modul (kronolith)
**Changes at 3 August 2017 - Enabled TLS, because some people became an error “Strong(er) authentication required”
For my steps I looked at the following documentation (and google):
https://dokuwiki.tachtler.net/doku.php?id=tachtler:horde5_-_framework
https://dokuwiki.nausch.org/doku.php/centos:mail_c7:horde_1
First we have to install the following packages:
- php-horde-horde (Basic Horde Installation)
- php-pecl-imagick (Manipulating graphics)
- aspell-en (english spell-checking; for other languages you possibly have to install other repositories)
# yum install php-horde-horde php-pecl-imagick aspell-en
Also you have to install MariaDB and Mailserver from Nethserver-Softwarecenter.
Now we have to change values in the php.ini file (my favorite to do it is nano, which you can install with yum install nano)
# nano /etc/php.ini
Attachment size for sending mail:
; Maximum size of POST data that PHP will accept.
; Its value may be 0 to disable the limit. It is ignored if POST data reading
; is disabled through enable_post_data_reading.
; http://php.net/post-max-size
; default: post_max_size = 8M
post_max_size = 100M
;;;;;;;;;;;;;;;;
; File Uploads ;
;;;;;;;;;;;;;;;;
; Whether to allow HTTP file uploads.
; http://php.net/file-uploads
file_uploads = On
; Temporary directory for HTTP uploaded files (will use system default if not
; specified).
; http://php.net/upload-tmp-dir
;upload_tmp_dir =
; Maximum allowed size for uploaded files.
; http://php.net/upload-max-filesize
; default: upload_max_filesize = 2M
upload_max_filesize = 20M
; Maximum number of files that can be uploaded via a single request
max_file_uploads = 20Say Garbage Collection to work not so often for better performance:
; Defines the probability that the 'garbage collection' process is started on every
; session initialization. The probability is calculated by using the following equation:
; gc_probability/gc_divisor. Where session.gc_probability is the numerator and
; session.gc_divisor is the denominator in the equation. Setting this value to 1
; when the session.gc_divisor value is 100 will give you approximately a 1% chance
; the gc will run on any give request. Increasing this value to 1000 will give you
; a 0.1% chance the gc will run on any give request. For high volume production servers,
; this is a more efficient approach.
; Default Value: 100
; Development Value: 1000
; Production Value: 1000
; http://php.net/session.gc-divisor
; default: session.gc_divisor = 1000
session.gc_divisor = 10000
Give users less information about php-version and horde-groupware, and forbid them to change global data:
;;;;;;;;;;;;;;;;;
; Miscellaneous ;
;;;;;;;;;;;;;;;;;

; Decides whether PHP may expose the fact that it is installed on the server
; (e.g. by adding its signature to the Web server header).  It is no security
; threat in any way, but it makes it possible to determine whether you use PHP
; on your server or not.
; http://php.net/expose-php
; default: expose_php = On
expose_php = Off
Configure timezone:
;;;;;;;;;;;;;;;;;;;
; Module Settings ;
;;;;;;;;;;;;;;;;;;;

[CLI Server]
; Whether the CLI web server uses ANSI color coding in its terminal output.
cli_server.color = On

[Date]
; Defines the default timezone used by the date functions
; http://php.net/date.timezone
; default: ;date.timezone =
date.timezone = 'Europe/Berlin'
To reach the configuration you have to make some changes to the php-horde-horde.conf
Open it with:
# nano /etc/httpd/conf.d/php-horde-horde.conf
Add Require ip IP to IfModule mod_authz_core.c section and add an Allow from IP to IfModule !mod_authz_core.c section as shown below:
IP = IP of the device which should connect to the server to administrate it
 <IfModule mod_authz_core.c>
     # Apache 2.4
     Require ip X.X.X.X
   </IfModule>
   <IfModule !mod_authz_core.c>
     # Apache 2.2
     Order Deny,Allow
     Deny from All
     Allow from 127.0.0.1
     Allow from ::1
     Allow from X.X.X.X
   </IfModule>
After that reload your webserver:
# systemctl reload httpd.service
Now we have to create a database:
# mysql

mysql> create database horde5;
Query OK, 1 row affected (0.00 sec)

mysql> CREATE USER 'hordeuser'@'FQDN of your Horde-Server' IDENTIFIED BY 'Your Password';
Query OK, 0 rows affected (0.00 sec)

mysql> GRANT ALL PRIVILEGES ON horde5.* TO 'hordeuser'@'FQDN of your Horde-Server' IDENTIFIED BY 'Your Password' WITH GRANT OPTION MAX_QUERIES_PER_HOUR 0 MAX_CONNECTIONS_PER_HOUR 0 MAX_UPDATES_PER_HOUR 0 MAX_USER_CONNECTIONS 0;
Query OK, 0 rows affected (0.00 sec)

 mysql> FLUSH PRIVILEGES;
 Query OK, 0 rows affected (0.00 sec)

mysql>quit
bye
Now we can test our new user:
# mysql -D horde5 -h FQDN of your Horde-Server -u hordeuser -p

Enter password:  Your Password
Welcome to the MariaDB monitor.  Commands end with ; or \g.
Your MySQL connection id is 217265
Server version: 5.1.73 Source distribution

Copyright (c) 2000, 2014, Oracle, Monty Program Ab and others.

Type 'help;' or '\h' for help. Type '\c' to clear the current input statement.

MySQL [horde5]>
The connection is ok, now we list the databases

MySQL [horde5]> show databases;
+--------------------+
| Database           |
+--------------------+
| information_schema |
| horde5             |
+--------------------+
2 rows in set (0.01 sec)


MySQL [horde5]> quit
 Bye
After that you can open your web-browser and navigate to X.X.X.X/horde/admin/config
click on gear-wheel, administration and configuration
click on Horde link at the table
click on Preferences tab and change the following
* $conf[prefs][maxsize] 65535
* $conf[prefs][driver] PHP Session
Click on the Database tab and change the following
* $conf[sql][phptype] MySQL (mysqli)
* $conf[sql][username] hordeuser
* $conf[sql][password] Your Password
* $conf[sql][protocol] TCP/IP
* $conf[sql][hostspec] FQDN of your Horde Server
* $conf[sql][port] 3306
* $conf[sql][database] horde5
* $conf[sql][charset] utf-8
* $conf[sql][ssl] [ ]
* $conf[sql][ca]
* $conf[sql][splitread] Disabled
press the button ‘Generate Horde Configuration’
Don’t be afraid, there could come a lot of problem reports, but after the next step everything would work great.
Back to terminal you can create the database tables with an existent script:
# /usr/bin/horde-db-migrate
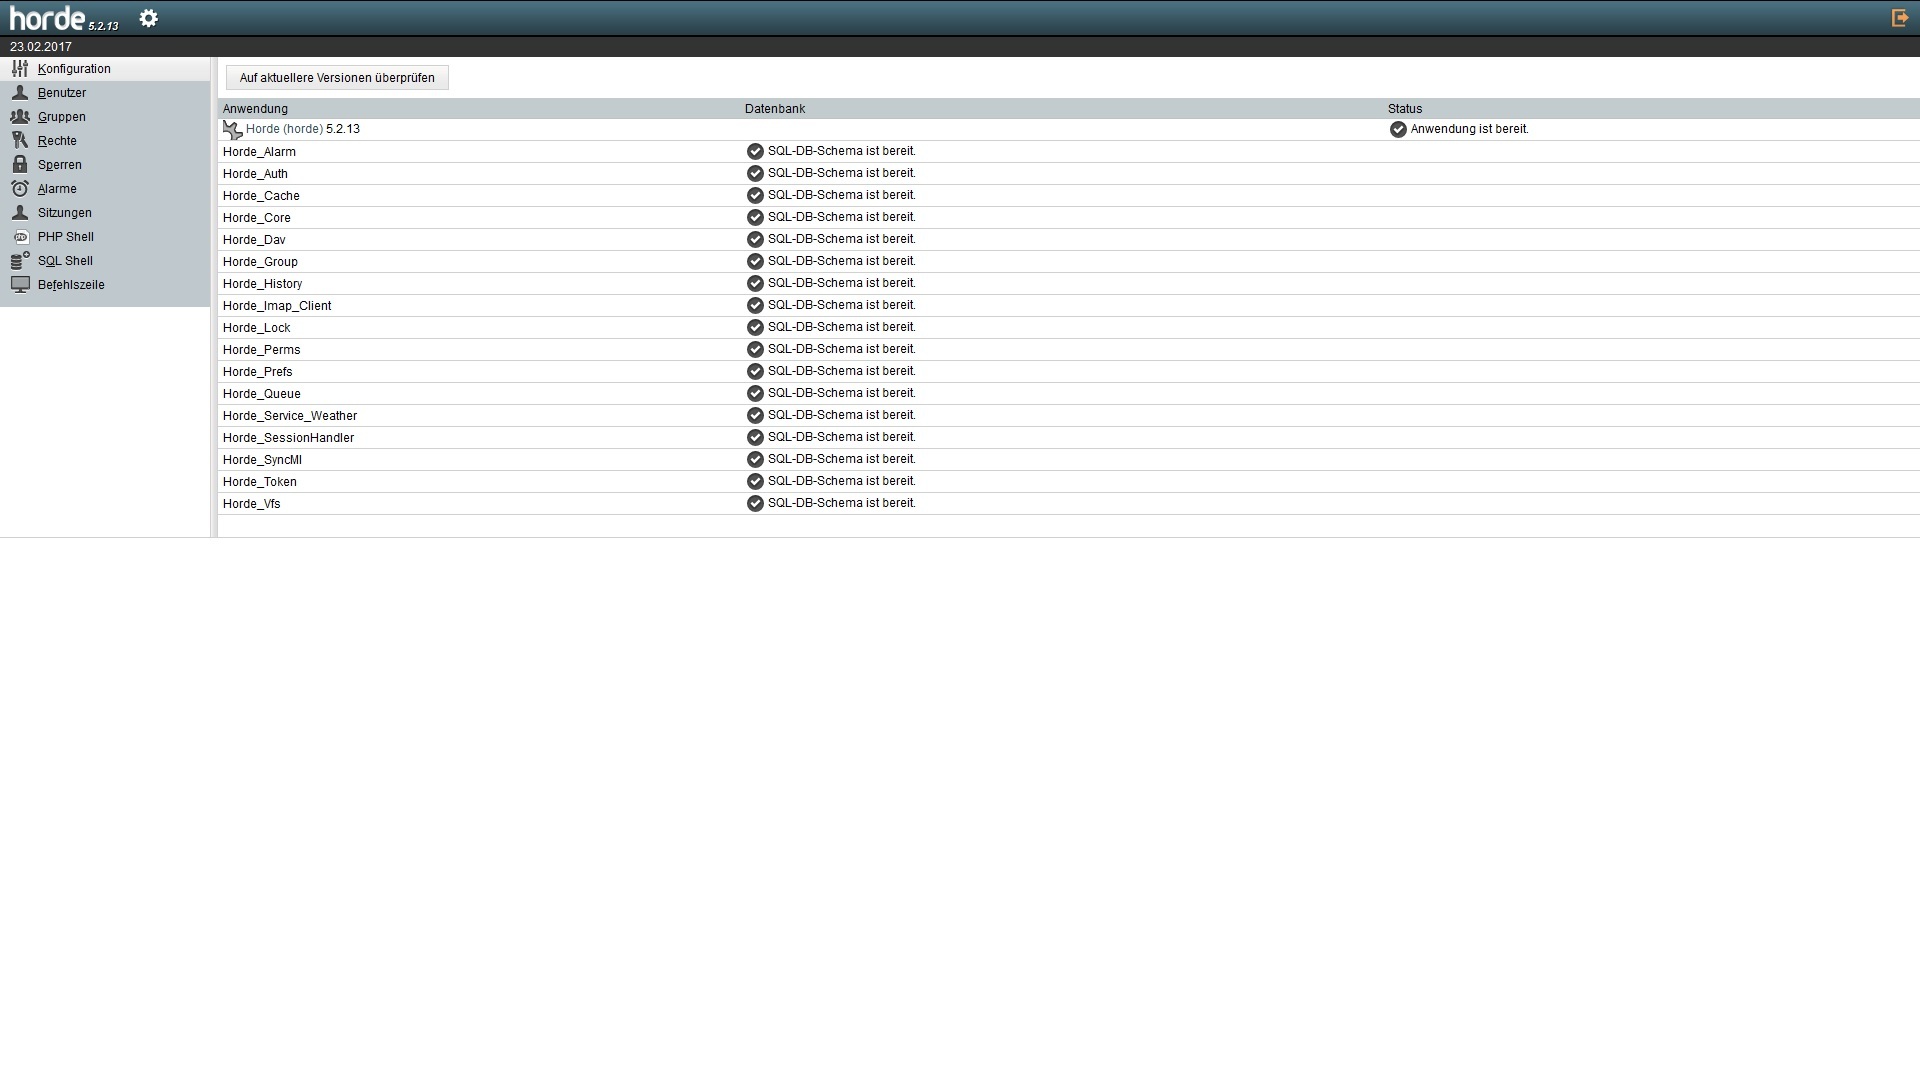
After that go back to the configuration at your browser. It should look like this:
Now you can change back the value at preferences tab from
PHP Session to SQL Database:
* $conf[prefs][maxsize]	65535
* $conf[prefs][driver] SQL Database
* $conf[prefs][params][driverconfig] Horde Defaults
* $conf[prefs][params][table]
press the button ‘Generate Horde Configuration’ to save the changes.
At this time we have installed the basic system of horde.
Binding to Nethserver’s Samba Account Provider
Documentation in the Internet I found at:
- https://www.skelleton.net/2013/05/12/installing-horde-5-and-configuring-it-for-active-directory-and-dovecot/
- http://www.cymea.net/active-directory-horde-5-1-x-ubuntu-14-04/
Thanks as well to @flatspin and @dnutan for their help to find the correct configuration.
For binding Horde to our Samba Active Directory we have to add and change some values at the configuration. Most of the values you get at Domain Accounts at your web-interface and at the terminal with:
account-provider-test dump
For configuration navigate to X.X.X.X/horde/admin/config where X.X.X.X is the IP-Adress of your server
click on gear-wheel, administration and configuration
click on Horde link at the table
click on LDAP tab and change the following:
$conf[ldap][useldap] yes
$conf[ldap][hostspec] IP of Samba Container
$conf[ldap][port] 389
$conf[ldap][tls] true
$conf[ldap][timeout] 5
$conf[ldap][version] 3
$conf[ldap][bindas] Bind with administrative/system credentials
$conf[ldap][binddn] your bindDN
$conf[ldap][bindpw] your bindPassword
$conf[ldap][user][basedn] cn=users,your baseDN
$conf[ldap][user][uid] samaccountname
$conf[ldap][user][filter_type] LDAP filter string
$conf[ldap][user][filter] (objectClass=user)
Now we have to go to the Authentication tab and do the following settings:
$conf[auth][admins] admin
$conf[auth][checkip] true
$conf[auth][checkbrowser] true
$conf[auth][resetpassword] yes
$conf[auth][resetpassword_from] leave it blank
$conf[auth][alternate_login] false
$conf[auth][redirect_on_logout] false
$conf[auth][list_users] show a dropdown list
$conf[auth][driver] LDAP authentication
$conf[auth][params][driverconfig] Horde defaults
$conf[auth][params][basedn] cn=users,your BaseDN
$conf[auth][params][scope] Subtree search
$conf[auth][params][sizelimit] leave it blank
$conf[auth][params][ad] true
$conf[auth][params][uid] samaccountname
$conf[auth][params][encryption] ssha
$conf[auth][params][newuser_objectclass] shadowAccount, inetOrgPerson
$conf[auth][params][filter] (objectclass=Person)
$conf[auth][params][password_expiration] no
$conf[auth][params][count_bad_logins] false
$conf[auth][params][login_block] false
$conf[auth][params][login_block_count] 5
$conf[auth][params][login_block_time] 5
At last we go to the Groups tab and enter the following values:
$conf[group][driver] LDAP
$conf[group][params][driverconfig] Horde defaults
$conf[group][params][basedn] cn=users,your BaseDN
$conf[group][params][scope] Subtree search
$conf[group][params][gid] cn
$conf[group][params][memberuid] member
$conf[group][params][attrisdn] yes
$conf[group][params][user][basedn] cn=users,your BaseDN
$conf[group][params][user][uid] samaccountname
$conf[group][params][user][filter_type] LDAP filter string
$conf[group][params][user][filter] (objectCategory=group)(objectClass=user)
$conf[group][params][newgroup_objectclass] posixGroup, hordeGroup
$conf[group][params][writedn] your bindDN
$conf[group][params][writepw] your bindPassword
$conf[group][params][search][filter_type] A complete LDAP filter expression
$conf[group][params][search][filter] (objectClass=group)
Now press the the button to generate the Horde configuration.
From now on you can login with your Samba users.
For getting full name and mail address from Samba Active Directory you have to build a hook.
Create a prefs.local.php file
> nano /etc/horde/prefs.local.php
and add the following:
<?php
// If you lock this preference, you must specify a value or a hook for it in
// horde/config/hooks.php.
$_prefs['fullname'] = array(
    'locked' => 'false',
    'value' => '',
    'hook' => 'true',
    'type' => 'text',
    'desc' => _("Your full name:")
);
// If you lock this preference, you must specify a value or a hook for it in
// horde/config/hooks.php.
$_prefs['from_addr'] =  array(
    'locked' => 'false',
    'value' => '',
    'hook' => 'true',
    'type' => 'text',
    'desc' =>  _("The default e-mail address to use with this identity:")
);
After that you have to build the hook-file.
nano /etc/horde/hooks.local.php
<?php
class Horde_Hooks
{
    public function prefs_init($pref, $value, $username, $scope_ob)
    {
        // LDAP connection parameters
        $ldapServer = '192.168.x.x'; //Adress of Samba Container
        $ldapPort = 389;
        $searchBase = 'cn=users,dc=MyDomain,dc=de';
        $binddn = 'MyBindDN';
        $bindpw = 'MyBindPW';

        switch ($pref)  {

            case 'from_addr':

                if (is_null($username)) {
                    return $value;
                }

                $ds = @ldap_connect($ldapServer, $ldapPort);
                if (ldap_start_tls($ds)) {
                   if (@ldap_bind($ds, $binddn, $bindpw)) {
                      $searchResult = @ldap_search($ds, $searchBase, 'samaccountname=' . $username);
                      $information = @ldap_get_entries($ds, $searchResult);
                      if (($information === false) || ($information['count'] == 0)) {
                          $user = $username . '@mydomain.de';
                      } else {
                          $user = ($information[0]['userprincipalname'][0] != '')
                          ? $information[0]['userprincipalname'][0]
                          : $information[0]['mail'][0];
                      }
                  }
                }

                ldap_close($ds);
                return empty($user) ? $username : $user;


            case 'fullname':

                if (is_null($username)) {
                    return $value;
                }
                $ds = @ldap_connect($ldapServer, $ldapPort);

                if (ldap_start_tls($ds)) {
                  if (@ldap_bind($ds, $binddn, $bindpw)) {
                      $searchResult = @ldap_search($ds, $searchBase, 'samaccountname=' . $username);
                      $information = @ldap_get_entries($ds, $searchResult);
                      if (($information === false) || ($information['count'] == 0)) {
                          $name = '';
                      } else {
                          $name = ($information[0]['displayname'][0] != '')
                          ? $information[0]['displayname'][0]
                          : $information[0]['givenname'][0];
                      }
                  }
                }
                ldap_close($ds);
                return empty($name) ? $username : $name;
        }
    }
}
Now we have to change the prefs.local.php and hooks.local.php ownership to apache.
chown apache:apache /etc/horde/prefs.local.php
chown apache:apache /etc/horde/hooks.local.php
Next step is to change user rights of hooks.local.php
chmod 640 /etc/horde/hooks.local.php
To check if everything works fine, login with admin user and go to configuration again. At the left side you can switch between users and groups, have a look if you see your users and groups here. If you click a user, you should see the username, the full name and the mail address.
Installation and configuration of webmail by using our local mailserver
Please install mailserver from softwarecenter. After that you have to install imp for webmail and ingo for filtering mails in terminal
yum install php-horde-imp
yum install php-horde-ingo
After installation go back to X.X.X.X/horde/admin/config at your browser and click on horde.
Possible messages about DB Shemas you can ignore at this time.
Go to mail tab and setup the following values:
$conf[mailer][type] SMTP server (HIGHLY RECOMMENDED)
$conf[mailer][params][host] smtp.YourDomain
$conf[mailer][params][port] 587
$conf[mailer][params][secure] tls
$conf[mailer][params][localhost] YourDomain
$conf[mailer][params][auth] Yes
$conf[mailer][params][username] admin@yourDomain
$conf[mailer][params][username_auth] true
$conf[mailer][params][password] YourPassword
$conf[mailer][params][password_auth] true
$conf[mailer][params][lmtp] false
Now we can go to IMAP Server tab and set the following values
$conf[imap][enabled] Enabled
$conf[imap][server] imap.YourDomain
$conf[imap][port] 143
$conf[imap][secure] tls
$conf[imap][maildomain] YourDomain
$conf[imap][cache_folders] true
Now press the button to generate the Horde configuration again.
We have to create a webmail configuration now, click at Webmail (imp). If you want you can change some values here.
If you have finished, click on generate Webmail-Configuration.
After that you have to Update All DB Schemas.
For that you have to click “Update All DB Schemas” at X.X.X.X/horde/admin/config.
Now you can use the mailsystem. Your mail-adress is the one from active directory.
Installation an configuration of calendar-module
Please install kronolith from terminal
yum install php-horde-kronolith
If finished go to X.X.X.X/horde/admin/config an click on calendar (kronolith).
Here the following values have to been set:
$conf[calendar][driver] = SQL
$conf[calendar][params][driverconfig] = Horde defaults
$conf[calendar][params][table] = kronolith_events
$conf[calendar][params][utc] = true
$conf[storage][default_domain] = YourDomain
$conf[storage][driver] = SQL
$conf[storage][params][driverconfig] = Horde defaults
$conf[storage][params][table] = kronolith_storage$conf[calendars][driver] = Default$conf[resource][driver] = SQL
$conf[resource][params][driverconfig] = Horde defaults
$conf[resource][params][table] = kronolith_resources
$conf[resource][params][utc] = true$conf[reminder][server_name] = FQDN of your Horde-Server
$conf[reminder][from_addr] = admin@YourDomain (or another mail-adress)$conf[autoshare][shareperms] = None (no sharing)
$conf[share][notify] = true[code]
$conf[holidays][enable] = true
[/code
$conf[menu][import_export] = true$conf[maps][driver] = No inline map support (If you want, of course you can activate the map support)Now press the button to generate the calendar configuration
At this time you can work with your calendar software.
CalDav support is implemented in Horde 5.
For synchronizing with Outlook you can work with CalDav Synchronizer
I had to disable using proxy-settings of system in CalDav-Synchronizer. If you create a synchronization profile click on advanced options, Network settings and deactivate „Use system default proxy“.


