Step 1.
Install stephdl Repository if havent already
sudo yum -y install http://mirror.de-labrusse.fr/NethServer/7/x86_64/nethserver-stephdl-1.1.9-1.ns7.sdl.noarch.rpm
Install GLPI-latest allong with the prerequisites
sudo yum -y install nethserver-glpi-latest mysql-devel gcc automake autoconf libtool make unzip git composer mosquitto mosquitto-clients mosquitto-dev openssl-perl
Step 2.
Get the source for mosquitto to build the auth plugin
cd ~
rpm -qa | grep 'mosquitto'
wget http://mosquitto.org/files/source/<output from previous cmd replace output from the second - to tar.gz>
and unpack it to folder mosquitto (after the moduale is built it can be removed)
mkdir ~/mosquitto && tar xCz ~/mosquitto -f mosquitto*.tar.gz && git clone https://github.com/KSATDesign/mosquitto-auth-plug.git && mv mosquitto-auth-plug /usr/lib/mosquitto-auth-plug
Then
To compile mosquitto-auth-plug
cd /usr/lib/mosquitto-auth-plug/
then run
make
To get Mosquitto to use mod-auth-plugin
mkdir /etc/mosquitto/conf.d/
echo "allow_anonymous false

auth_plugin /usr/lib/mosquitto-auth-plug/auth-plug.so

auth_opt_backends mysql

auth_opt_host localhost

auth_opt_port 8105

auth_opt_user glpi

auth_opt_dbname glpi

auth_opt_pass $(cat /var/lib/nethserver/secrets/glpi)

auth_opt_userquery SELECT password FROM glpi_plugin_flyvemdm_mqttusers WHERE user='%s' AND enabled='1'

auth_opt_aclquery SELECT topic FROM glpi_plugin_flyvemdm_mqttacls a LEFT JOIN glpi_plugin_flyvemdm_mqttusers u ON (a.plugin_flyvemdm_mqttusers_id = u.id) WHERE u.user='%s' AND u.enabled='1' AND (a.access_level & %d)

auth_opt_cacheseconds 300

listener 8883

cafile /etc/mosquitto/certs/cachain.pem

certfile /etc/mosquitto/certs/cachain.pem

keyfile /etc/mosquitto/certs/private-key.key

tls_version tlsv1.2

ciphers ECDHE-RSA-AES128-GCM-SHA256:ECDHE-ECDSA-AES128-GCM-SHA256:ECDHE-RSA-AES256-GCM-SHA384:ECDHE-ECDSA-AES256-GCM-SHA384:DHE-RSA-AES128-GCM-SHA256:DHE-DSS-AES128-GCM-SHA256:kEDH+AESGCM:ECDHE-RSA-AES128-SHA256:ECDHE-ECDSA-AES128-SHA256:ECDHE-RSA-AES128-SHA:ECDHE-ECDSA-AES128-SHA:ECDHE-RSA-AES256-SHA384:ECDHE-ECDSA-AES256-SHA384:ECDHE-RSA-AES256-SHA:ECDHE-ECDSA-AES256-SHA:DHE-RSA-AES128-SHA256:DHE-RSA-AES128-SHA:DHE-DSS-AES128-SHA256:DHE-RSA-AES256-SHA256:DHE-DSS-AES256-SHA:DHE-RSA-AES256-SHA:AES128-GCM-SHA256:AES256-GCM-SHA384:ECDHE-ECDSA-RC4-SHA:AES128:AES256:HIGH:!RC4:!aNULL:!eNULL:!EXPORT:!DES:!3DES:!MD5:!PSK
" > /etc/mosquitto/conf.d/flyvemdm.conf
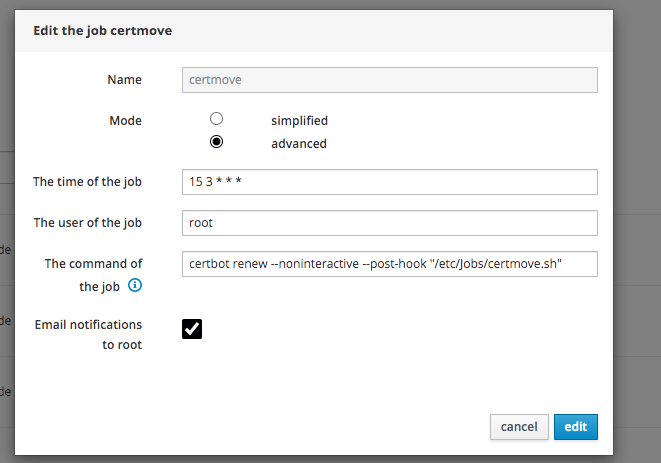
We need to setup a script for moving certs and rehassing them for authentication for mosquitto and setup a Cron Job
If on the server your ad is on use the following if its on a different one you need to have the certs coppied to your glpi server first then moved and rehasshed
The Script

cat > /etc/Jobs/certmove.sh <<EOF

#!/usr/bin/bash

sudo cp /etc/letsencrypt/live/yourdomain.tld/fullchain.pem /etc/mosquitto/certs/cachain.pem

sudo cp /etc/letsencrypt/live/yourdomain.tld/privkey.pem /etc/mosquitto/certs/private-key.key

sudo chmod 600 /etc/mosquitto/certs/private-key.key

sudo chown mosquitto:root /etc/mosquitto/certs/private-key.key

sudo c_rehash /etc/mosquitto/certs

sudo systemctl restart mosquitto

echo "done"

EOF
create the Cron job
nano /etc/crontab
15 3 * * * certbot renew --noninteractive --post-hook "/etc/Jobs/certmove.sh"

* * * * * /usr/bin/php7.3 /usr/share/glpi/front/cron.php &>/dev/null # add this while were there
save and
systemctl reload crond
Step 3.
To get composer to use php-7.3 instead of the default 5.2
edit bashrc file like so
nano ~/.bashrc
Then add
alias composer="php73 /bin/composer"
and save
Lastly issue
source ~/.bashrc
To avoid having to log out and in again for the settings to take effect.
Step 4.
Now to setup Fusion Inventory and FlyveMDM you need to run the following it will tell you not to run as root accept it to run as root anyway and you will also have to tell it you accept to install composer plugins
Issue command
git clone https://github.com/fusioninventory/fusioninventory-for-glpi.git /usr/share/glpi/plugins/fusioninventory && git clone https://github.com/flyve-mdm/glpi-plugin.git /usr/share/glpi/plugins/flyvemdm
Then
cd /usr/share/glpi/plugins/fusioninventory
make clean && make && composer install
/usr/share/glpi/plugins/flyvemdm
composer init - then follow the prompts to select the default option
then
make clean && make && composer install
Now go to the web gui go to Setup → Plugins and click install on fusion inventory first and enable then the same for flyvemdm
Step 5.
To Setup LDAP(Nethserver AD) Under the glpi webinterface go to Setup > Authentication > LDAP directories and fill out the following:
------------------------------------------------LDAP Server Connection----------------------------------------------------
Default server=Servername-(or fqdn either works i believe it’s more of a descriptive name)

Active=Yes

Server=ldaps://ad.yourdomain.tld

Port=636

Connexion filter (all users) : (&(objectClass=user)(objectCategory=person))
Connexion filter (all enabled users) :(&(objectClass=user)(objectCategory=person)(!(userAccountControl:1.2.840.113556.1.4.803:=2)))
BaseDN=dc=ad,dc=yourdomain,dc=com,dc=au

RootDN=ldapservice@AD.YOURDOMAIN.COM.AU

Password your password for ldapservice

Login Field=samaccountname

Synchronization field=objectguid
---------------------------Binding to the LDAP directory (at least for anyone using Nethserver as ad)---------
Surname=sn

First name=givenname

Email=mail

Phone=telephonenumber

Mobile phone=mobile

Picture=thumbnailphoto

Location=%{streetaddress},%{postalcode},%{st},%{co}
--------------------Belonging to groups--------------
Search type=Users and Groups

User attribute containing its groups=memberof

Filter to search in groups=(objectClass=user)
--------------------------------------------Advanced information---------------------------------------------------------
LDAP directory timezone=yourGMT Offset if unsure check here *Note if you get an error about mysql cant access timezone use this script thanks to @stephdl
fixtimezone.sh
#!/bin/bash

source /opt/rh/rh-mariadb105/enable
mysql --socket=/run/rh-mariadb105-mariadb/glpi-mysql.sock  -e "GRANT SELECT ON mysql.time_zone_name TO 'glpi'@'%';"
mysql --socket=/run/rh-mariadb105-mariadb/glpi-mysql.sock -e "FLUSH PRIVILEGES"
su - apache -s /bin/bash -c "/opt/rh/rh-php73/root/bin/php /usr/share/glpi/bin/console glpi:maintenance:enable"
mysql_tzinfo_to_sql /usr/share/zoneinfo | mysql --socket=/run/rh-mariadb105-mariadb/glpi-mysql.sock mysql
su - apache -s /bin/bash -c "/opt/rh/rh-php73/root/bin/php /usr/share/glpi/bin/console glpi:migration:timestamps --no-interaction"
su - apache -s /bin/bash -c "/opt/rh/rh-php73/root/bin/php /usr/share/glpi/bin/console glpi:maintenance:disable"
Domain name used by inventory tool for link the user=ad.yourdomain.com.au
then go to Administration > Users
click on [LDAP Directory Link]
Then Click on [Import new users]
and on [expert mode]
and [search]
then do the same for groups
Note: On your ad to allow for strong authentication using Letsencrypt for the cert you need to copy the ad cert to the samba container to use ldaps to do that in a terminal add the following
cat <<EOF >>/etc/e-smith/events/certificate-update/S80push2ad
cp -f -p /etc/pki/tls/certs/localhost.crt  /var/lib/machines/nsdc/var/lib/samba/private/tls/cert.pem
cp -f -p /etc/pki/tls/private/localhost.key  /var/lib/machines/nsdc/var/lib/samba/private/tls/key.pem
chmod 600 /var/lib/machines/nsdc/var/lib/samba/private/tls/key.pem
chmod 644 /var/lib/machines/nsdc/var/lib/samba/private/tls/cert.pem
systemctl -M nsdc restart samba
EOF
Step 6.
The start up script
cat <<EOF >>/etc/systemd/system/flyvemdm.service

[Unit]
Description=Flyve Mobile Device Management for GLPI
Wants=network.target
##########################################################################
ConditionPathExists=/usr/share/glpi/plugins/flyvemdm/scripts/mqtt.php
##########################################################################

[Service]
Type=simple
User=httpd
Group=httpd
ExecStart=/usr/share/glpi/plugins/flyvemdm/scripts/loop-run.sh
Restart=on-failure
SyslogIdentifier=flyvemdm
[Install]
WantedBy=multi-user.target
EOF
then issue
`systemctl daemon-reload`
`systemctl start flyvemdm.service`
`systemctl enable flyvemdm.service`
Step 7
Enable email notifications by going to https://host.yourdomain.tld/glpi/front/setup.notification.php
and enable the following
Enable followup => Yes
Enable followups via email => Yes
Enable followups from browser => Yes
then go to https://host.yourdomain.tld/glpi/front/notificationmailingsetting.form.php
and fillout you mail server details
then go to https://virtualhost/glpi/front/crontask.form.php?id=22
In queuednotification settings
change Run Mode => CLI
Step 8
Setup API
go to https://host.yourdomain.tld/glpi/front/config.form.php
set the following under general
URL of the application = http://yourhost.domain.tld/glpi
Please note if using nethserver as reverse proxy remember to set it as HTTP otherwise it will have redirection errors
and go to api
Set the Following
URL of the API = http://yourhost.domain.tld/glpi/apirest.php
Please note if using nethserver as reverse proxy remember to set it as HTTP otherwise it will have redirection errors
Enable Rest API => Yes
Enable login with credentials => Yes
Enable login with external token => Yes
and create an api client
leave all blank except name
Name => a name of your choice
IPv4 Address Range=> your start and end iprange
Enable and save
Then go through the wizard (most things have been configured just need to Allow upload of APK and UPK files and follow the steps about disabling computers and inventory by name)
